Friday 7 December 2012

Kite Projects: Conclusion

Kite Projects:
Conclusion to my project

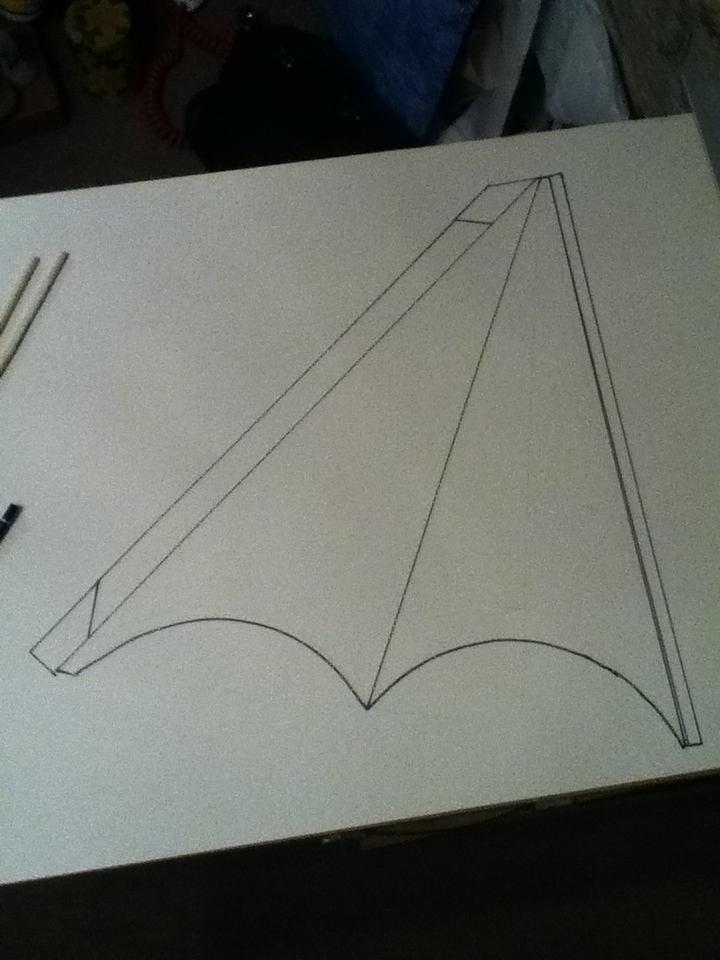
"in conclusion to my project I believe that I was quite successful  as I was able to create a kite that was capable of flying in the sky. I learnt a lot by doing this project things such as resourcing materials, allowing time for ordered materials to arrive in the post. one of the parts of this project i most enjoyed was drawing out the templates for my kite, cutting out the material and sewing it up on the sewing-machine. before this project I was a bit of a novice on the sewing-machine, but by doing this project my confidence on the sewing-machine has grown."

"one thing I found difficult about this project was, having to fly the kite in the dark. it made doing repairs and tweaks on my kite Very difficult  when I was out at the park in very low light, it took me a few night to get photos of my kite that I was happy with."

Kite Project: flying My Kite

Kite Project:
flying My Kite
Flying my Kite:


Artistic photography & editing:


"I wanted to take a photo that showed the movement of my kite in the sky, in order to do that I used motion blur and photo editing software to achieve this outcome."


"I used grey-scale to edit some of my images  I was looking at the idea that my images could be used as wall art as well as documentational photographs."

Kite Project: My Final Kite


Kite Project:
My Final Kite


Initially trying to fly my kite at selly oak park:


"When I initially tried to fly my kite i experience a few problems with the design of my kite, there wasn't enough support on the back of my kite at the bottom, so that every time it tried to get up in the air it folded and reduced its surface area. it would have been ok and able to hold itself open once it was in the air , but the process of getting it up in the air cause my kite to fold an prevent it from getting any higher in the air."

Making alterations to my kite:


"I added a new cross beam support to my kite across the bottom to give greater support to my kite,and help it to keep my kite open and with the greatest surface area possible."

Kite Project: My glowing spider

Kite Project: 
My glowing spider


Creating my Character:
Prototype 1:

Creating my Character: 
prototype 2

"instead of creating two character I decided to stick to creating one character, with a lot of detail an articulation. I wanted to give my character a cartoonist  friendly quality. in order to achieve this I added googly eyes and pipe-cleaner legs that can more and articulate."


Creating a Character:
Prototype 2 - my final spider:


"this is my final spider with glow sticks to illuminate his overall shape, so that i can be seen in the dark."


"My spider glowing in the dark, unfortunately i want able to use my spider on my kite, when i finally went to fly it because it was to heavy and was weighing my kite down. so instead it is now an accessory to go with my kite as a keep sake that the children who could fly the 'child's delta kite' could keep afterwards."


Wednesday 5 December 2012

Kite Project: Spider Web

Kite Project:
Spider Web

"This is what my final kite looks like it is a delta kite made out of black polyester lining.
I was initially influenced to give my kite the theme of a spiders web by the shape that has been created at the bottom of my delta wings. I though that a spider's web design would be good because i can reflect the shape created at the bottom of my kite wings up the kite forming the spider web pattern."


In order to help me paint the web design accurately onto my kite wings I made a template of the basic shapes: straight lines & arch's.


Initially I panted the pattern using white acrylic paint to give definition to my pattern as well as to act as a base coat on to which I later added my glow-in-the-dark paint.


after using my template to get the initial size and shape of my spider web patter marked out onto my kite I painted the rest of the pattern by hand, i used two coats of the white acrylic and two coats of the glow-in-the-dark paint.

Sunday 25 November 2012

Kite Project: Giving My kite a Theme

Kite Project:
Giving My kite a Theme

Idea 1:
JellyFish Kite

Idea 2:
Spider Web Kite
"I am going to make the kite out of black polyester lining, and glow-in-the-dark paint for the web design."


"I am going to add a character onto my kite to make it more child friendly and interesting."


Kite Project: Kite Development, Prototype 2

Kite Project:
Development
Prototype 2: 
Plan


Cutting Pattern:


Centre pocket plans:

Cutting out my Fabric:

Sewing my kite together:


Centre Pockets:


Biased Binding:

Completed Kite:
Prototype 2:

"I am going to use this as the main design for my final kite, although I am going to make it twice as big, I am also going to make it out of black, polyester lining instead of white polyester cotton. I am also going to use carbon-fibre rods that i have acquired out of an old kite, instead of using dowel in order to keep my overall kite weight down." 


Kite Project: Kite Development


Kite Project:
Kite Development 


"In order to start developing the shape Kite I would like to make, I decided to make a simple kite out of a plastic bag, some spare dowels and masking tape."

Prototype 1:


My original delta kite plan


 pocket folds for my dowels to sit in 


direction of fabric biased to allow my kite to fly an not stretch and sag

"I had to think about many aspects when creating my kite, things such as the direction that my fabric should be cut in to allow for stretch  tension and optimum flying ability. As well as alloying excess on my kite to create pockets for my dowels as well as added sewing allowance"


"I did cut out a kite in  a highly shiny fabric but unfortunately the fabric was also highly stretchy which cause a major problem when it came to sewing my kite together, even a simple seem ended up wonky un-usable side to my kite." 

"Therefore for my next kite i have bought a flat poly cotton bead sheet, which is much easier to sew and manipulate to create a kite capable of flying."

Spar Placing:


Spar Pockets & guide loops
"This illustrates how I intend to attach the spars to my kite, rolled pockets for the edge spars, and central pockets at top and bottom for the middle spar with guide loops for extra support."